Projects & Collaboration
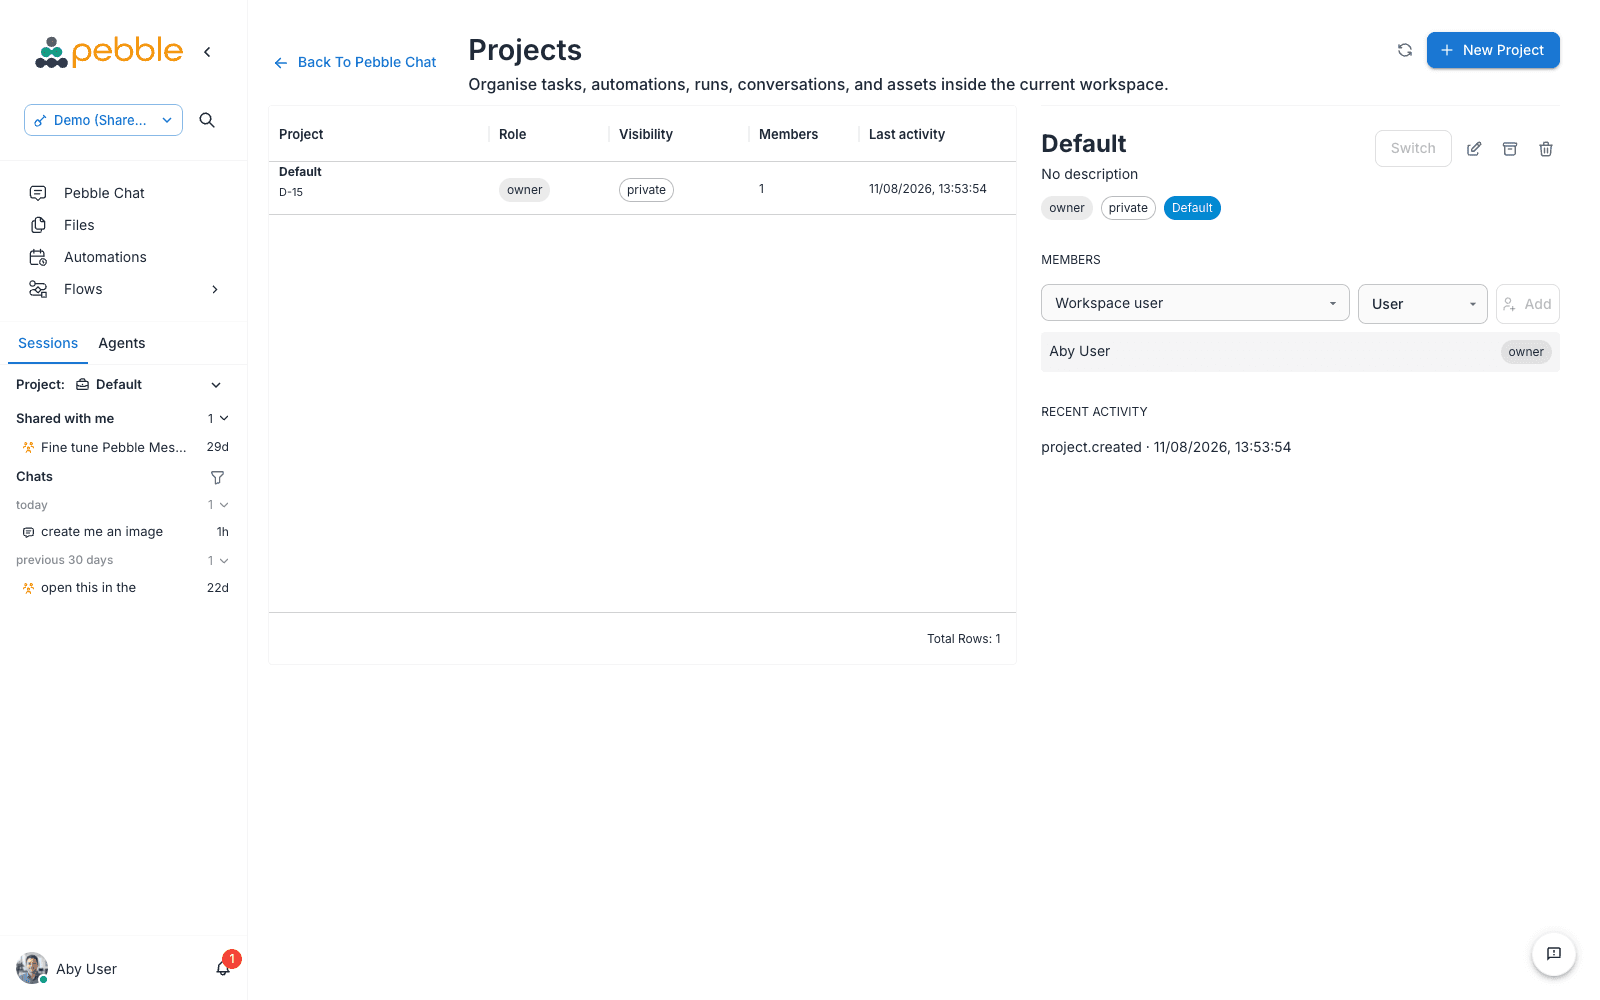
Projects group related work inside a workspace. As the Projects page puts it: “Organise tasks, automations, runs, conversations, and assets inside the current workspace.” Switch project and your PebbleChat history switches with you — every conversation, task and run belongs to a project.
Projects are also the backbone of collaboration: conversations can be shared with individual colleagues or with a whole project, and shared conversations are genuinely live — several people and Pebble, in the same chat, at the same time.
Projects and workspaces
Workspaces and projects sit at different levels:
- Workspaces are the outer container — you switch between them with the workspace switcher at the top of the sidebar
- Projects live inside a workspace — you switch between them from the Project: row in the chat history
Every workspace comes with a default project, which can’t be archived or deleted — so there’s always somewhere for your work to live.
The Projects page
Open it from the Project: row’s menu (Manage projects). The page lists every project you can see in the current workspace, with a New project button in the header. Columns:
| Column | What it shows |
|---|---|
| Project | The project name, with its project key beneath |
| Role | Your role on the project — owner, admin or user |
| Visibility | Private or Workspace |
| Members | How many people are on the project |
| Last activity | When the project was last active |
Creating a project
Click New project on the Projects page, or use the create option on the Project: row in the chat history — handy when you realise mid-chat that a topic deserves its own project. The dialog asks for:
| Field | Notes |
|---|---|
| Name | The project’s display name |
| Description | Optional |
| Visibility | Private or Workspace — the value is shown in the Visibility column on the Projects page |
Managing a project
Click any row on the Projects page to open its detail panel. From there:
- Switch — make this the active project (disabled if it already is)
- Rename project — opens the same dialog as creation, with a Save button
- Archive project — retires the project
- Delete project — removes it entirely
A few guard rails apply:
| Action | Who can do it |
|---|---|
| Switch | Any project member |
| Rename / Archive | Owner or admin — disabled for members with the user role |
| Delete | Owner only |
| Archive or delete the default project | Nobody — always disabled |
Members and roles
The detail panel is also where you manage who’s on the project. Adding members is how a project is “shared” — there’s no separate share button:
- Use the Workspace user autocomplete (“Search by name or email”) to find someone — they must already belong to the workspace
- Pick a role — User or Admin
- Click Add
Owners additionally see a Make owner button next to each member, which transfers ownership of the project. Non-owner members can be removed with the X (Remove project member).
| Role | What it allows |
|---|---|
| Owner | Everything — including deleting the project and transferring ownership with Make owner |
| Admin | Rename and archive the project |
| User | Work inside the project — chats, tasks, automations and runs — but not rename, archive or delete it |
A project you’re added to appears in your own Projects list and project switcher automatically.
Projects and your chat history
The payoff of projects is a focused chat sidebar:
- The history shows only the selected project’s conversations, so switching project switches your entire chat context
- Chats pinned to a project appear in a shared Pinned section — when one project member pins a conversation, other members see it pinned too and can open it. Unpinned chats stay private to their owner
- Chats shared to the project appear in every member’s Chats list; chats shared with you personally appear under Shared with me
- Task- and flow-created conversations land in the project alongside your own chats
See Conversations & History for the full sidebar walkthrough.
Treat shared pins as the project’s noticeboard: pin the kickoff conversation, the agreed brief, or the recurring report chat, and every member finds them in the same place.
Sharing a conversation
Any conversation you own can be shared — with individual colleagues, or with the chat’s own project so every member gets it. Four routes lead to the same place:
| Route | How |
|---|---|
| The @ menu | Type @ in the composer and pick a colleague under Share this chat with — they’re granted access and mentioned in one step, with an undo window and a confirming toast |
| Chat options | The history row’s three-dot menu → Share with… |
| Room Meta | The People row’s + (Add people or share conversation) |
| Right-click | Right-click in the transcript → Add User |
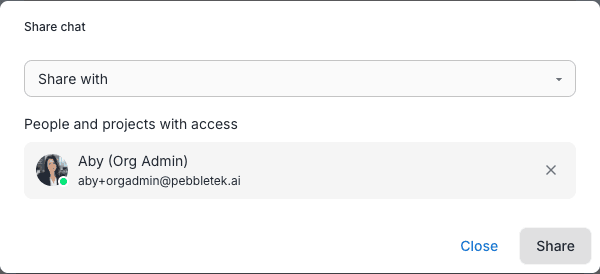
The Share chat dialog has one picker — Share with (“Search people or project”) — listing your workspace colleagues and, if the chat lives in a shareable project, the project itself as “Project name (project)”. Everyone who already has access is listed under People and projects with access, each with a remove button.
You can even share a chat you haven’t sent yet — pick people with @ in a fresh chat and they’re added and notified when your first message goes.
Invite links
As the chat’s owner you’ll also see Room invitation link in the share dialog — Copy link, with Regenerate link and Disable link in its menu. The link is not a back door: “Anyone using this link must sign in. Only active, authenticated people in this organization and workspace can join.” Regenerating kills the old link without removing anyone already in the room.
What recipients see and can do
A recipient is notified — “Invited to chat title — You can now join this conversation” with an Open conversation button — and the chat appears in their Shared with me section (direct shares) or their project’s chat list (project shares).
Recipients read and participate: they send messages, work with the canvases, and use their own permissions and connections. Managing the chat stays with its owner — only the owner can rename, delete, share further, or change the audience. There are no per-person permission levels to configure.
Owner controls: locking and going private
Right-click the transcript for owner-only audience controls:
- Lock Room — keeps the owner and current people as explicit participants and removes broader project access
- Make Private — removes every other user and all shares; the conversation returns to being only yours
Both show a preview of exactly who is retained and removed before you confirm, and warn when the invitation link will stop working.
Sharing boundaries
- Shares stay inside your workspace — recipients must be active members of the same organisation and workspace
- A chat can only be shared to its own project, and never to the default project
- Everything a share grants is enforced server-side, per call, against each participant’s own entitlements
Working live together
A shared conversation is a live room:
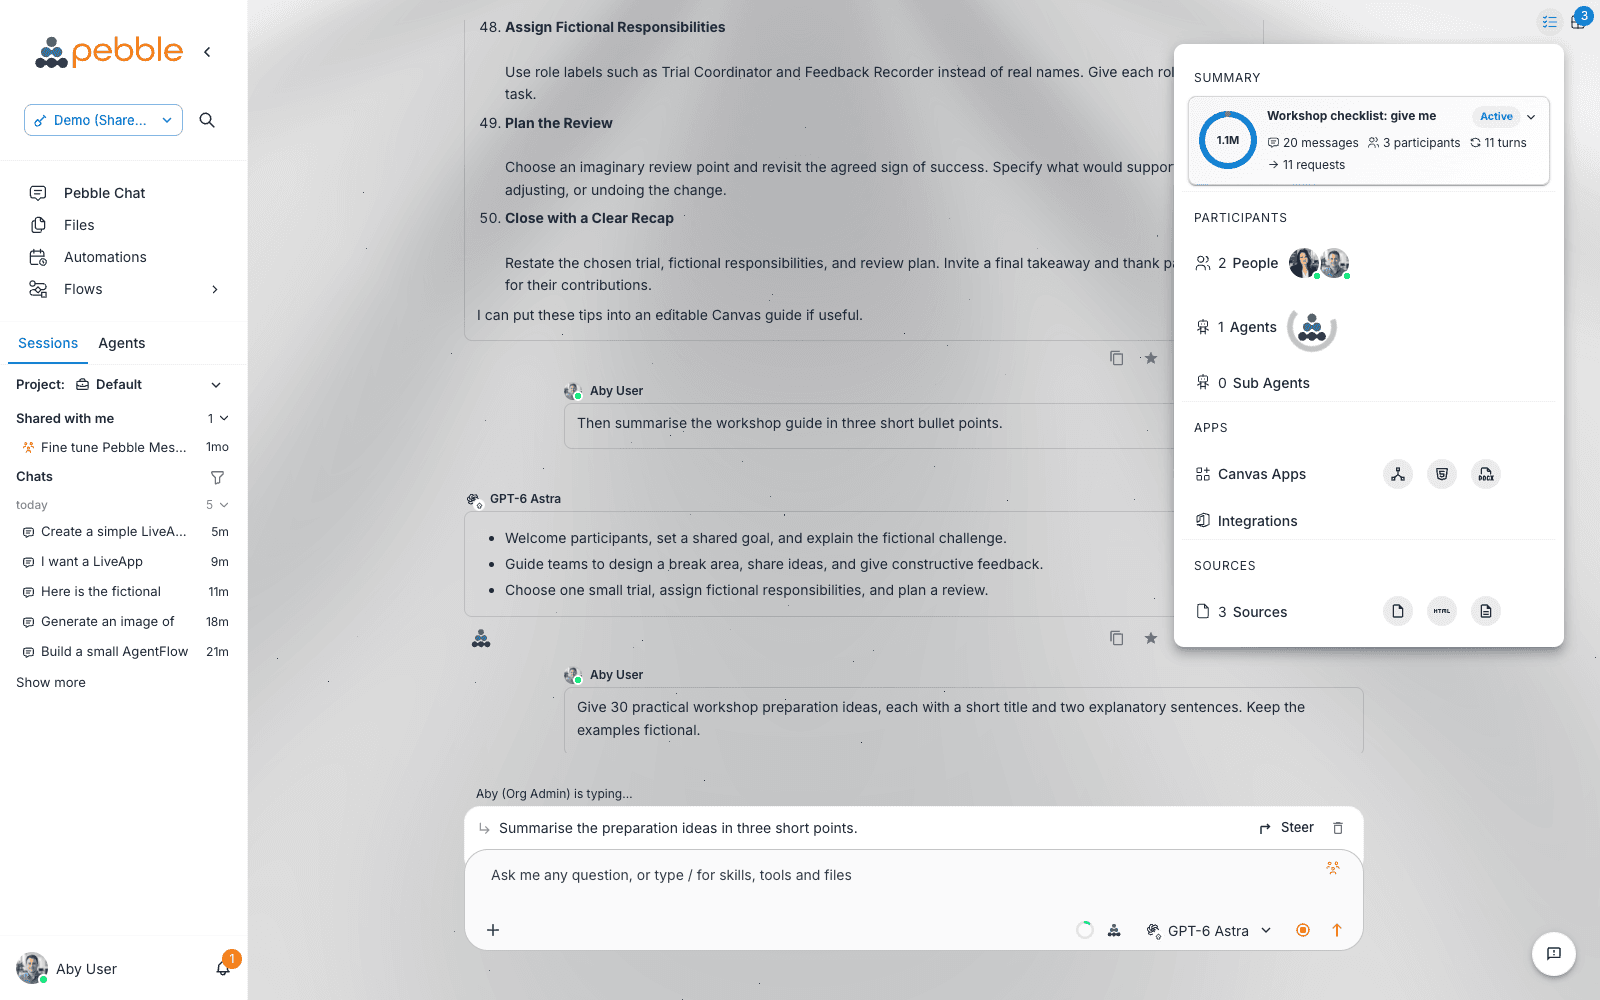
- Presence and typing. Participant avatars carry live presence dots, and ”… is typing” appears above the composer as colleagues write.
- A visible cue. Shared chats show a group icon by the composer with the tooltip “Caution: This is a shared conversation” — click it to see exactly who’s here.
- Everyone’s turns queue fairly. If Pebble is mid-response when someone sends, their request joins a visible queue above the composer — each entry shows the prompt, who sent it, and its position. Queued turns are durable: they survive reloads and run in order. You can remove your own queued item; the room owner can manage all of them.
- Steer instead of waiting. A queued instruction can be applied into the running turn — the Steer action redirects Pebble mid-response rather than waiting for a whole new turn. If Pebble is midway through a tool it can’t safely abandon, the steer is applied the moment that tool finishes (the button tells you so).
- Canvases are co-edited. Everyone in the chat works on the same live canvas — named cursors and carets on documents, code, Word files, HTML and diagrams, with an Active document users avatar stack in the Canvas header. See Canvas.
- Direct messages. Need a side word?
/dm @nameopens a private conversation scoped to the room — or right-click a person’s name and choose Direct Message.
Room Meta is the room’s control panel — the checklist icon at the top right. Collapsed, it’s a pulse: participants, messages, turns, and a context gauge. Expanded, it breaks down People, Agents, Canvas Apps, Integrations, and Sources, each opening a fuller management view.
Requirements
- The Projects page and chat history require the pebblechat:view permission
- Projects need an active organisation and workspace — without one the page shows the alert “Active organization and workspace are required for projects.”
Related
- Conversations & History — the project switcher, pinned chats, Shared with me, and the project-scoped sidebar
- Capabilities & Context — the @ menu that shares by mention
- Canvas — multi-user co-editing in shared chats
- Tasks & Automations — the tasks, automations and runs a project organises
- Workspaces — the container projects live in