Organisation Capabilities
The Capabilities page under Admin → Organisation → Settings is where you control which external integrations and Flows assets are available to users in your organisation.
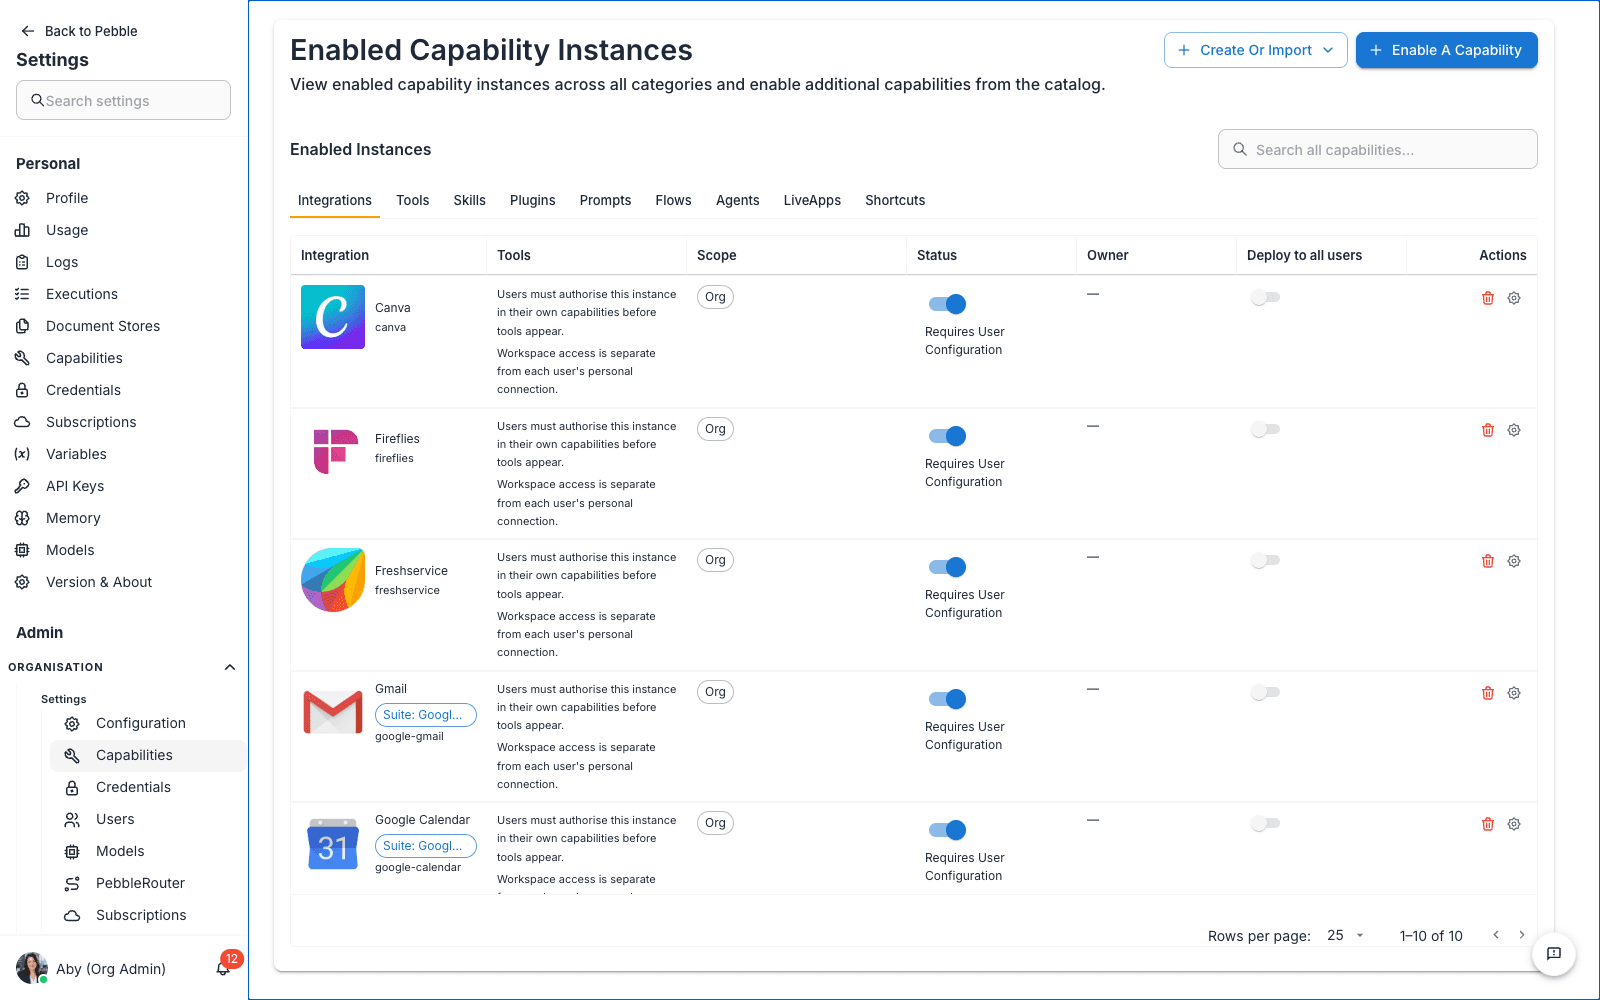
Find it at Admin → Organisation → Settings → Capabilities.
Don’t confuse this with User Settings → Capabilities. This page is organisation-level provisioning — what’s available to be enabled by users. The User Settings page is where individual users actually toggle them on for their own sessions.
What a capability is
A capability is anything that extends what PebbleChat or Flows can do beyond the base model. Capabilities are grouped into tabs:
| Tab | What it contains |
|---|---|
| Integrations | Connections to third-party platforms via MCP (Microsoft 365, Jira, Salesforce, custom MCP servers) |
| Tools | Individual tools — web search, calculators, code interpreters, custom HTTP tools |
| Skills | Claude Code-compatible prompt templates with optional Python code that runs in the sandbox (full detail) |
| Plugins | Packages (ZIP upload, GitHub, or marketplace) that bundle several components — skills, agents, flows, and tools — imported and rolled out as one unit |
| Prompts | Reusable prompt templates provisioned for your organisation |
| Flows | Chatflows and Agentflows from Flows |
| Agents | Agent definitions from Flows Agentflow V2 |
| LiveApps | Sandboxed runnable mini-apps — see LiveApps for per-app governance |
| Shortcuts | Saved shortcut commands users can invoke in chat — see Shortcuts |
The page header banner reads “View enabled capability instances across all categories and enable additional capabilities from the catalog.”
The Enabled Instances tables
Every tab uses the same table layout — per-column sorting and filtering, pagination — and a shared column contract:
- Name — the capability (integrations show logo, connected account, and suite)
- Description — what it does (Tools adds a Connection column; Shortcuts shows a Target)
- Scope — Platform, Org, Workspace, or User; plugin-bundled rows carry a Bundled chip
- Status — the enable toggle plus a status label
- Owner — who owns the row (admin view only)
- Deploy to all users — the org-wide deploy lever (admin view only)
- Actions — configure, share, remove
Deploy to all users appears on every tab, but only Skills, Plugins, and LiveApps/catalogue Shortcuts have a working toggle today. On the other tabs it’s disabled with a tooltip explaining why — tools follow their integration connection, integrations are per-user authorisations, and deploying flows, agents and prompts to all users isn’t supported yet.
Above the tables are a cross-type search, an Enable a Capability button (browse the catalogue), and a Create or Import menu (create a skill, import a skill, import a plugin).
Step-by-step: enabling Microsoft 365
- Click Enable a Capability
- Browse the catalogue and pick Microsoft 365
- The integration is added to the Enabled Instances table with status Requires User Configuration
- Configure the OAuth client — paste the Microsoft Entra ID app’s Client ID and Tenant ID into the integration’s settings
- Save
- Tell your users they can now connect their Microsoft accounts via User Settings → Capabilities
- Each user authenticates with their own Microsoft account; the org-level config provides the OAuth shell, the user-level config provides the per-user identity
For full setup details, see the Microsoft 365 integration guide.
Step-by-step: enabling Jira
- Click Enable a Capability
- Pick Jira from the catalogue
- Configure the Jira instance URL and OAuth credentials
- Save
- Users connect their personal Jira accounts via User Settings → Capabilities
Tabs explained in detail
Integrations
Top-level connections to third-party platforms via MCP (Model Context Protocol). One integration provides many tools — Microsoft 365, for example, provides email, calendar, files, Teams, OneNote, and SharePoint tools.
Tools
Individual tools, including the integration tools (one row per Microsoft 365 sub-tool, etc.) plus standalone tools like Brave Search, Tavily Search, Calculator, Code Interpreter.
This is where you’d disable a specific tool from a capable integration — for example, leaving Microsoft 365 enabled but disabling the “send email” tool to prevent PebbleChat from sending email on users’ behalf.
Skills
Skills are Claude Code-compatible prompt templates — a Persona plus optional supporting files and code — that PebbleChat loads on demand when they match a user’s task. They’re a major capability with their own documentation at PebbleChat → Skills. This tab is where you manage them at organisation level.
What you see in this tab
Every skill that’s been imported or created at platform, organisation, workspace, or user scope. The table has six columns:
- Skill — the skill’s name
- Description — what it does
- Scope — a chip reading
Platform,Org,Workspace, orUser - Status — the enable/disable toggle with its status label
- Deploy to all users — admin-only toggle; on deploys the skill to everyone, off undeploys it (see Rolling out a skill)
- Actions — open, edit, remove
Details such as the skill’s runtime (none for prose-only, python, or node — deferred), its security scan result, and its source are shown in the skill’s detail dialog rather than in the table.
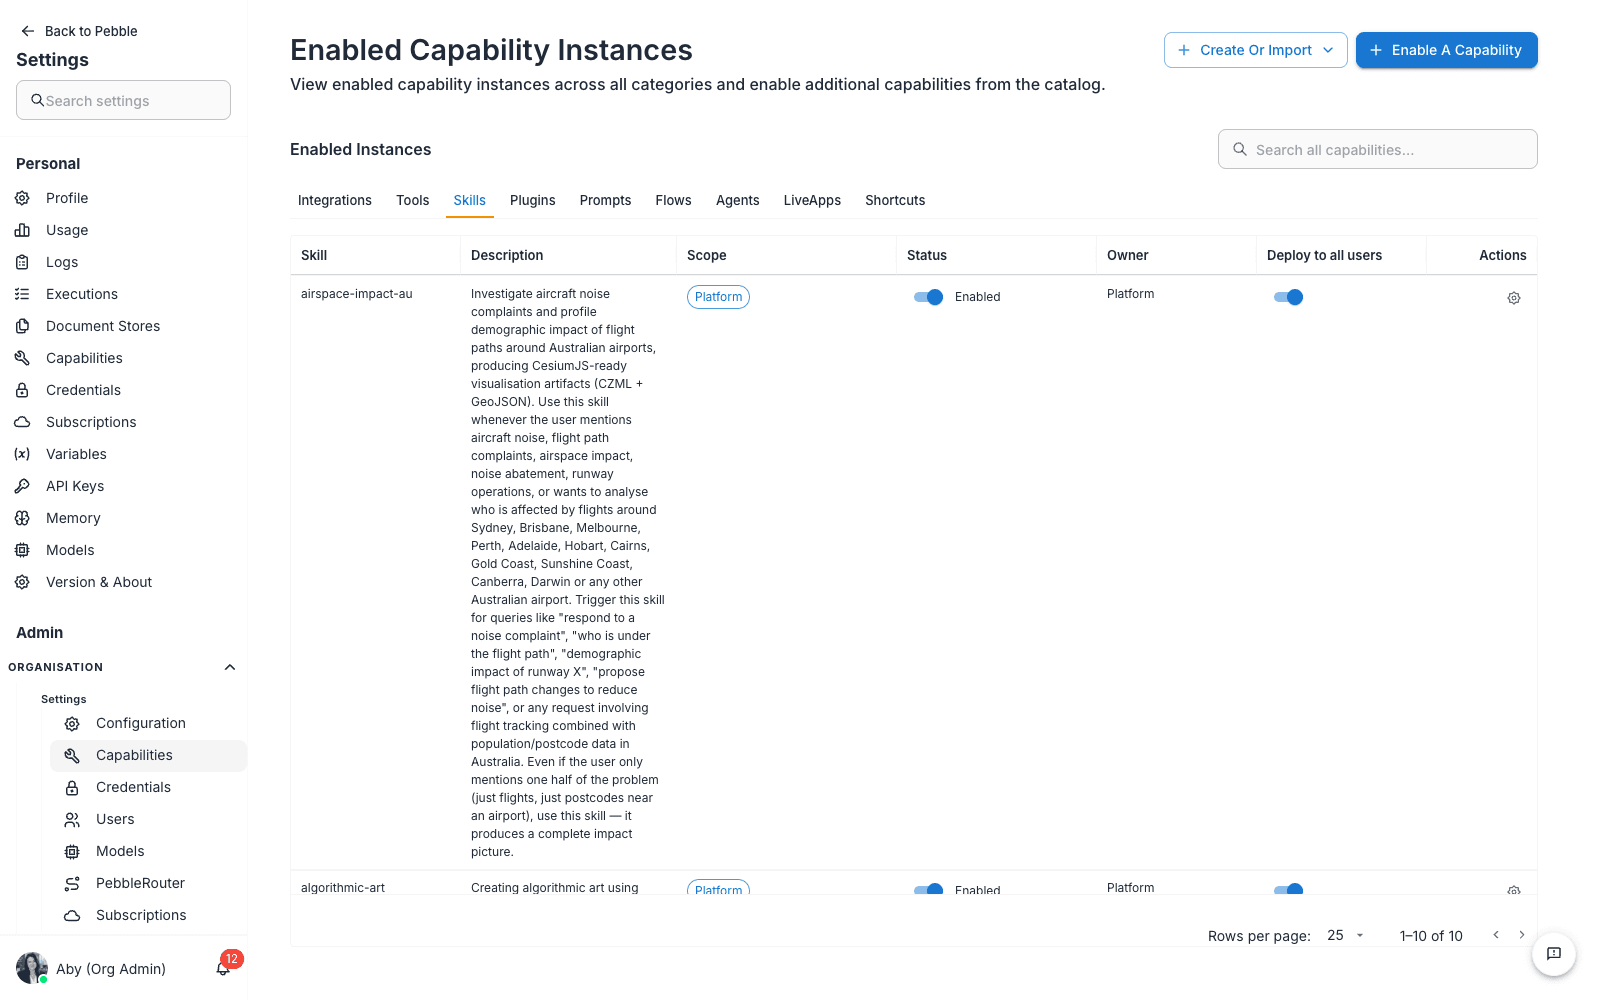
Above the list are a shared search box and a Create or Import dropdown button (create a new skill, import a skill from the library, or import a plugin from a repository), alongside the Enable a Capability button.
Rolling out a skill: Off, Available, Deployed
Open a skill’s catalogue detail dialog as an org admin and you’ll see a Rollout section — a plain-language ladder instead of a single deploy button:
| Stage | What it means |
|---|---|
| Off | Not listed anywhere; nobody can use it |
| Available | Listed in your organisation’s capabilities catalogue. Each person turns it on themselves — nothing runs until they do |
| Deployed | Turned on for every user in your organisation now — no action needed from them |
Two toggle rows control the ladder independently: Organisation (Off / Available / Deployed) and This workspace (Off / Available). Each stage shows a one-line consequence description, so you always know exactly what you’re switching on.
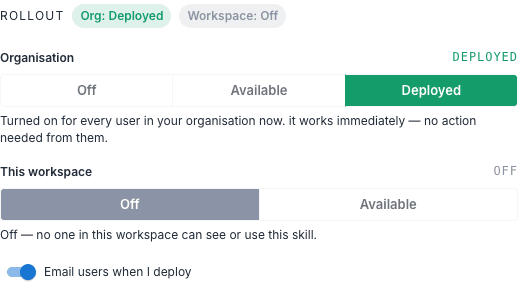
- Deployment is scope-level. People who join the organisation (or a deployed workspace) later automatically inherit the skill — you never re-deploy for new starters.
- The Email users when I deploy switch (on by default) notifies affected users when you choose Deployed. The notice is titled Skill installed and includes the skill’s name and description — users don’t need to take any action; the skill is immediately discoverable in their next chat.
For a quicker path, the Skills tab also has an admin-only per-row Deploy to all users toggle — switch it on to deploy, off to undeploy. It stays disabled until the skill’s Status toggle is on (tooltip: “Enable Status first to deploy”).
Skills use this single Off → Available → Deployed ladder. Plugins get a more flexible two-axis control — see Plugins below.
Step-by-step: scoping a skill to one workspace
- Import or create the skill with workspace scope
- Pick the target workspace in the import dialog
- Save
- The skill is visible only to users in that workspace
- Users in other workspaces won’t see it in their Skills management page or discover it at chat time
Use this for team-specific patterns — e.g. a cyber-incident-response skill that should only be available to your security team.
Step-by-step: importing from the Anthropic official catalogue
Anthropic’s public skills repository (github.com/anthropics/skills) offers ready-made skills — such as pdf, docx, xlsx, and pptx — that you can import via the steps below.
To import skills from public sources:
- Click Create or Import → Import skill from library
- Paste a GitHub tree URL (e.g.
github.com/anthropics/skills/tree/main/pdf) or a rawSKILL.mdURL - Pick the Target scope — User (only me), Workspace, or Organization. A Platform (managed catalog) option appears only for platform administrators
- The security scanner runs automatically. Any
blockfindings fail the import;warnfindings require your acknowledgement before proceeding - Confirm
- The skill is now available at the chosen scope
Skill imports accept a GitHub tree URL or a raw SKILL.md URL only. ZIP upload is a plugin feature — to import a ZIP package, use Import Plugin instead.
Security scanner
Every import, regardless of source, runs through a 13-rule security scanner before it’s stored. The scanner has three severity levels:
- Block — rejected immediately. Rules: shell injection in SKILL.md body,
allowed-tools: Bash(...)in frontmatter, binary executables, files > 2 MB or aggregate > 8 MB, body > 256 KB - Warn — requires acknowledgement. Rules: prompt injection phrases, exfiltration URLs to non-allow-listed domains, hidden Unicode / bidi overrides
- Info — logged for context. Rules: Python runtime required (auto-adds
pebbleRuntimes: python), Node runtime required (auto-addsnode— execution deferred), shell scripts present (reference text only, not executed)
See PebbleChat → Skills → Security scanner for the user-facing detail.
Skills that execute code
Skills declaring pebbleRuntimes: ['python'] need the code execution sandbox to be available in the target workspace. The sandbox runs Python 3.12 in a gVisor-isolated Kubernetes pod with 1 vCPU, 1 GiB RAM, a 120-second wall-clock timeout, and default-deny network egress. Output files (PDFs, images, spreadsheets) are uploaded to the user’s file store automatically.
If the sandbox isn’t enabled in your deployment, Python skills will still import successfully but won’t run. The Runtime availability gate in the discovery pipeline hides them from users whose workspace can’t execute their code. See Code Execution Sandbox for deployment details.
Plugins
Plugins are packages that bundle several capabilities — skills, agents, flows, and tools — so you can import, roll out, and remove them as one unit. A plugin might ship a customer-onboarding skill, the agent that runs it, and the flow it orchestrates, all versioned together.
Importing a plugin
- Click Create or Import → Import plugin from repository
- On the Import Plugin page, pick a Source type: GitHub repo or tree URL, Official marketplace entry URL, or Zip file upload
- Choose the Target scope — your own account, a workspace, or the organisation
- Click Scan Plugin — the scan preview lists every component in the package (skills, agents, flows) with its security scan result
- Block-level findings stop the import; warnings require you to tick “I reviewed the warnings and trust this plugin source.”
- Click Import Plugin
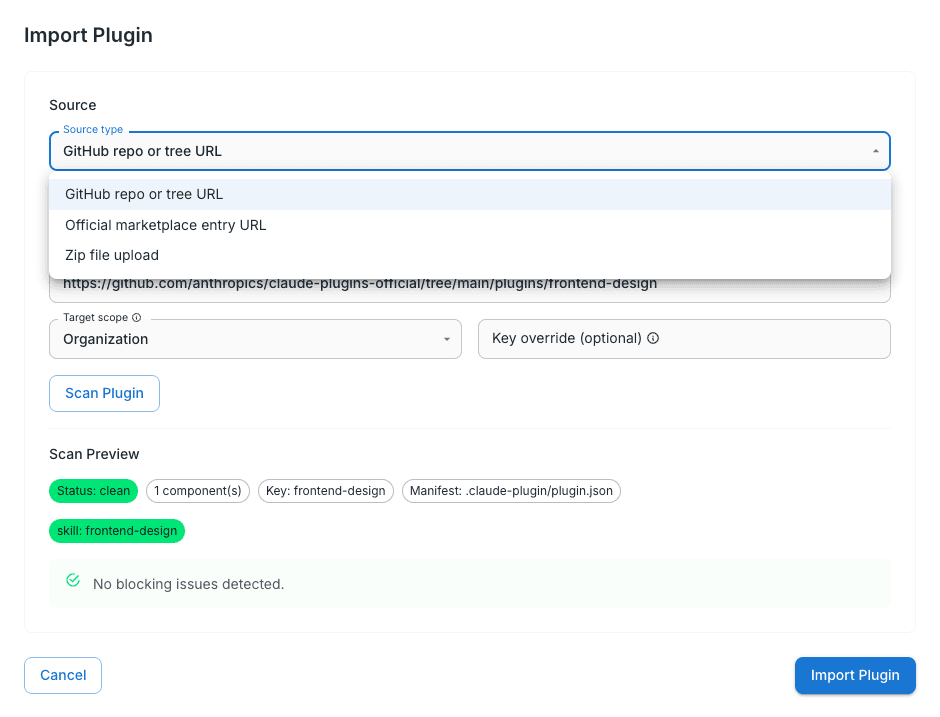
After the import you land straight on the plugin’s detail dialog in the capabilities catalogue, ready to roll it out.
Pebble-supported capabilities don’t need importing at all. As the Import Plugin page itself puts it: Pebble-supported capabilities arrive automatically through the Capabilities Catalog and are managed by your Platform Admin — you enable the ones your organisation wants rather than importing them here. Catalogue-delivered packages are immutable versions: each carries a semantic version and a content checksum (shown in the catalogue detail alongside publisher, licence, and scan status), and updated content always arrives as a new version — bytes of an existing version can never change.
The Plugins tab
Each imported plugin appears as a row on the Plugins tab, showing the plugin name and key, a components chip (how many of its bundled components are supported), the provider, a Status toggle, and actions including Uninstall plugin.
Plugins have full management parity with skills: enable or disable with the Status toggle, deploy and undeploy from the detail dialog, and uninstall when you’re done. Uninstalling a plugin also removes the flows, skills, and agents it brought with it, so deleting and re-importing never leaves duplicates behind.
Rolling out a plugin: Availability vs Deployment
Open a plugin’s detail dialog as an org admin and you get two independent controls — the key difference from the skills ladder:
| Control | Question it answers | Options |
|---|---|---|
| Availability | Where is this listed so people can turn it on themselves? | Whole organisation, or specific workspaces |
| Deployment | Who is this turned on for right now? | Whole organisation, selected workspaces, and/or specific users |
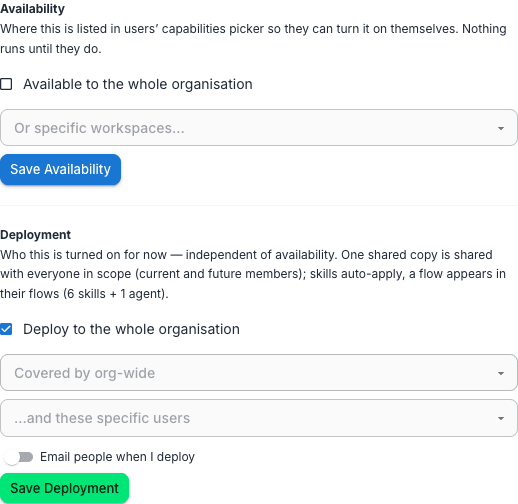
Because the two axes are independent, you can:
- Deploy quietly — switch a capability on for one team without listing it in anyone else’s picker
- Offer without forcing — list it in the catalogue for self-serve opt-in without turning it on for anyone
Availability saves with Save availability; Deployment saves with Save deployment and has its own Email people when I deploy switch (off by default) that notifies affected users.
One shared copy, inherited by later joiners
Deployment creates one shared copy per scope, not a private copy per person. Deploy a plugin containing a flow to a workspace of forty people and everyone sees one shared flow — not forty clones. Two consequences:
- Later joiners inherit automatically. Anyone who joins a deployed workspace or organisation after the fact receives the same shared capability without you re-deploying.
- Edits fork safely. When a team member who isn’t the owner or an admin saves changes to a shared deployed flow, they’re prompted with “Save as your own copy?” — their edits become a private copy while the shared version stays unchanged for everyone else. Owners and org admins save in place.
What non-admins see
Users without org admin access see Install for Me and Uninstall buttons in the catalogue detail dialog instead of rollout controls — self-serve opt-in for anything you’ve made Available.
Prompts and Shortcuts
The Prompts tab manages the organisation’s prompt library: your Status toggle here disables a prompt org-wide — it disappears from every user’s catalogues, pickers, and deck tiles (users see it labelled Disabled by org). The Shortcuts tab shows catalogue shortcuts (with enablement and deploy) alongside users’ pinned tiles, each row’s Target saying what it opens.
For plugin-bundled LiveApps and Shortcuts, the Status switch is a per-item block: toggle one off to block just that item for your organisation while its parent plugin stays enabled — the tooltip spells out which plugin it follows.
Flows
Chatflows and Agentflows that have been promoted to organisation-level capabilities. A flow listed here can be referenced from the / menu by anyone in the org — it’s not just available within its source workspace.
Agents
Multi-agent definitions from Flows Agentflow V2. An agent listed here is an organisation-level agent any user can invoke.
Disabling a capability instance
Flip the toggle in the Status column off for any row to temporarily disable a capability without removing it. The integration’s stored OAuth tokens, configuration, and connection state are all preserved — flip it back on when you want to use it again.
When to disable temporarily:
- Provider outage — disable so PebbleChat doesn’t keep retrying broken calls
- Security incident response — disable an integration whose credentials may have leaked while you investigate
- Cost control — disable expensive tools (e.g. paid web search) until budget refresh
Removing a capability instance
Click the delete icon to fully remove. Removal:
- Revokes any stored OAuth tokens
- Clears configuration
- Removes the capability from every user’s available list (forces users to re-authenticate if you re-add it later)
Capabilities and asset discovery
Every capability you provision here is eligible for asset discovery — when a user sends a PebbleChat message, the discovery system can match it against any provisioned capability and pull the relevant ones into context automatically.
For asset discovery to work well:
- Capability instances need clear descriptions
- Users need access to the capability (i.e. they’ve completed any per-user OAuth)
- The capability needs to be marked as discoverable in Flows (for flows and agents — see Asset Sharing)
See PebbleChat → Capabilities & Context for the user-side view.
Tips
- Provision integrations early. Users see the integration in their Settings → Capabilities page only after you’ve enabled it here. Get the common ones provisioned before you announce PebbleAI to the team.
- Disable rather than delete when you might come back. Deletion forces every user to re-authenticate, which is a hassle.
- Match scope to actual need. Don’t enable every integration just because you can — each one is a security surface and a thing to keep updated.
- Watch usage in PebbleObserve → Logs to see which capabilities your team actually uses. Cull the unused ones quarterly.
Related
- User Settings → Capabilities — the user-side view; where individual users toggle their own access
- PebbleChat → Capabilities & Context — how users invoke capabilities from chat
- Asset Sharing — how flow/agent/document store sharing works at asset level
- Flows Integrations — the catalogue of integrations and their setup details