Organisation Models
The Models page under Admin → Organisation → Settings is where you decide which models from the platform catalogue your organisation can use, and which credentials authenticate calls to them.
Find it at Admin → Organisation → Settings → Models.
What you see
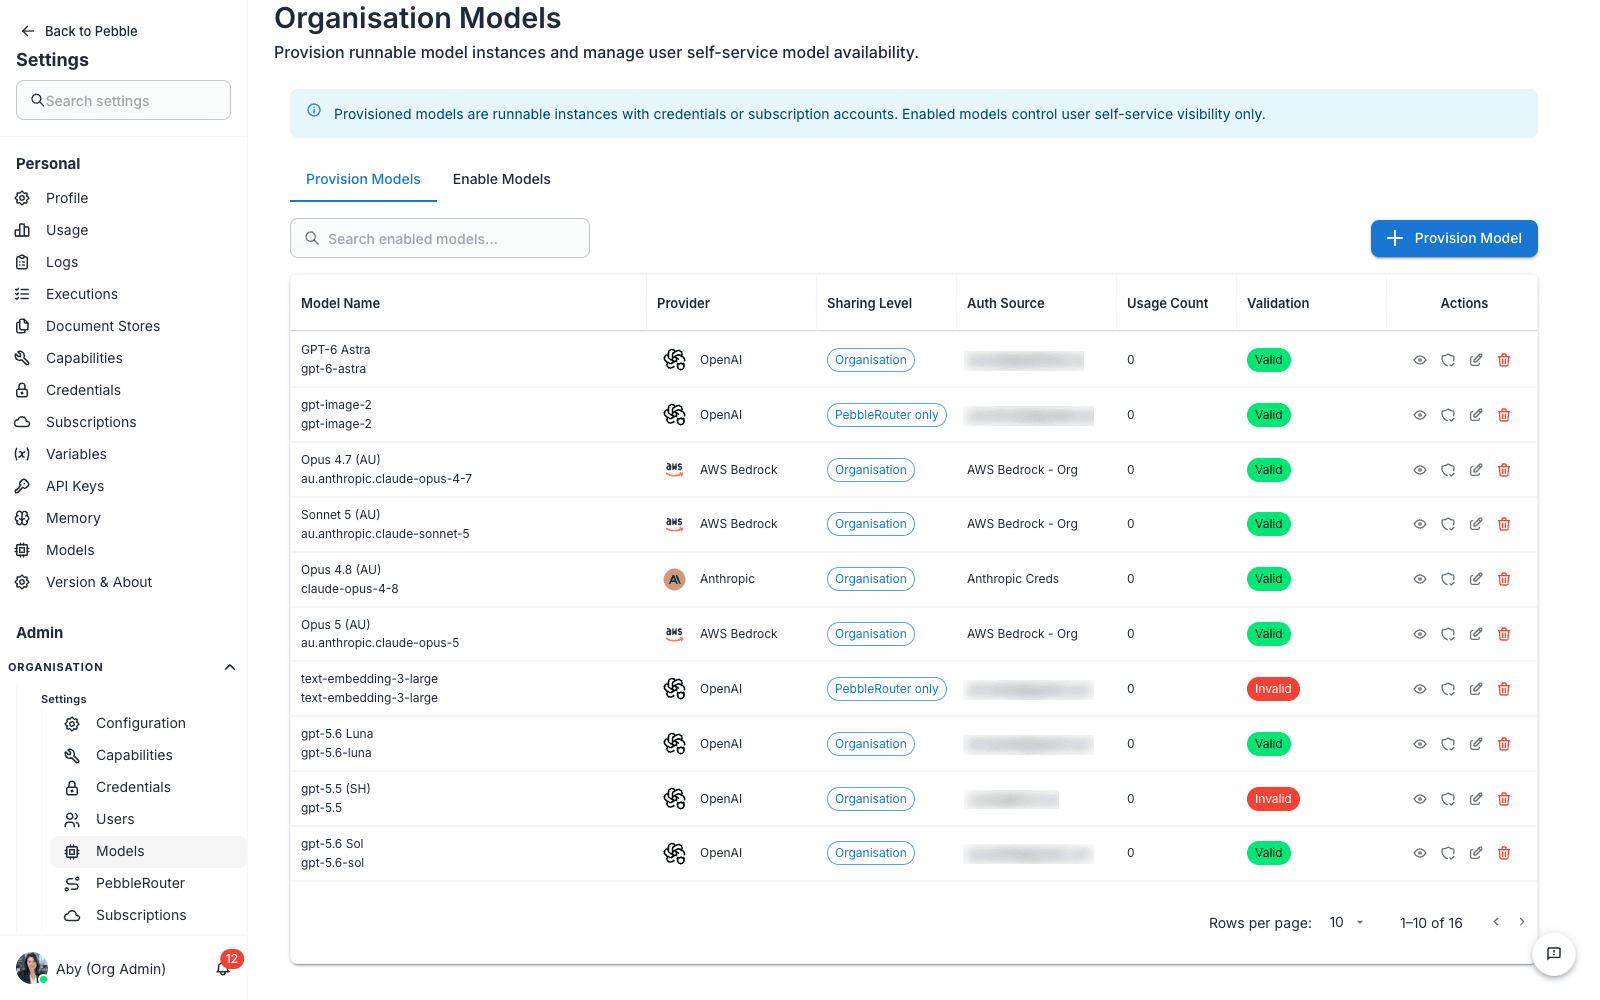
A page titled Organisation Models with the description “Provision runnable model instances and manage user self-service model availability.”
An info alert at the top reads:
Provisioned models are runnable instances with credentials or subscription accounts. Enabled models control user self-service visibility only.
Below that are two tabs:
| Tab | What it does |
|---|---|
| Provision Models (default) | Create and manage runnable model instances — a model definition bound to an auth source (API credential or subscription account) at a target scope |
| Enable Models | Manage which model definitions are available — for org-admin provisioning and, optionally, for user self-service provisioning |
The Provision Models tab
Each row of the provisioned-instances table shows:
| Column | What it shows |
|---|---|
| Model Name | The model identifier (e.g. au.anthropic.claude-opus-4-6-v1) |
| Provider | The underlying AI provider (AWS Bedrock, OpenAI, Anthropic, etc.) |
| Sharing Level | Organisation (whole org), Selected Workspaces (specific workspaces), User Only (self-provisioned by a user), or PebbleRouter only (PebbleRouter can use it but it doesn’t show in user model selectors) |
| Auth Source | The API credential or subscription account that authenticates calls (e.g. AWS Creds) |
| Usage Count | How many times this model has been called |
| Actions | Edit, remove, or change sharing scope |
Above the table is a Provision Model button (top-right) and a search box. The button opens the Provision Model dialog: give the instance a Provisioned Model Name, pick the Credential (the dropdown lists API credentials and connected subscription accounts, plus a + Add credential shortcut), and choose the Target Scope — Organisation, Selected Workspaces, or PebbleRouter only.
The Enable Models tab
Lists the model definitions available to your organisation. Each row’s Configure button opens the Configure Enabled Model dialog, whose User Self-Service Scope picker controls whether users may provision the model for themselves: No user scope (org-admin provisioning only), Organisation, or Selected Workspaces.
The provisioning chain
Models flow through two admin layers, with an optional user self-service layer:
Platform admin   →   Organisation admin   →   User (optional)
(catalogue) (this page — provision) (self-provisions)- Platform admin maintains the catalogue of all models PebbleAI knows how to call. Most installs ship with hundreds of model definitions covering OpenAI, Anthropic, AWS Bedrock, Google, Mistral, Cohere and others.
- You (organisation admin) provision runnable instances from enabled definitions, binding an auth source and choosing the target scope. Instances scoped to the Organisation or to Selected Workspaces appear for those users in PebbleChat straight away — no user action needed.
- Users may additionally provision models for themselves — with their own API credential or subscription account — at User Settings → Models, but only for definitions whose User Self-Service Scope you’ve opened up on the Enable Models tab.
Sharing levels
The Sharing Level column controls how a provisioned instance can be used:
Organisation
The instance is available to everyone in the organisation — it appears in users’ PebbleChat model selectors immediately. This is the most common scope.
Selected Workspaces
The instance is available only inside the chosen workspaces. Users in other workspaces don’t see it. Useful when one team has paid for or been granted access to a model that the rest of the org shouldn’t use.
User Only
An instance a user has provisioned for themselves via self-service, backed by their own credential or subscription account. Only that user can use it. You’ll see these rows here, but the scope is only offered on the user-side page.
PebbleRouter only
A special scope that makes the model available to PebbleRouter for routing decisions, but does not show it in user model selectors. Useful when you want intelligent Auto routing to fall back to a model that you don’t want users to be able to pick directly — for example, a fallback model that’s only there for capacity reasons.
PebbleRouter only instances can also be selected as your organisation’s (or a workspace’s) default Embedding Model — see Embedding defaults through PebbleRouter below.
Step-by-step: provisioning a Bedrock Claude model for the org
- On the Provision Models tab, click Provision Model in the top-right
- Select an enabled model definition, e.g.
au.anthropic.claude-opus-4-6-v1(if it isn’t listed, enable it first on the Enable Models tab) - Give the instance a Provisioned Model Name
- Pick the Credential that authenticates Bedrock calls (the AWS credential you added in Credentials) — the dropdown also lists connected subscription accounts and a + Add credential shortcut
- Pick Target Scope: Organisation
- Save
- The instance now appears in the table with
Organisationscope and shows up in users’ PebbleChat model selectors immediately
Step-by-step: changing sharing scope
- Click the model row to open the editor
- Change the scope (e.g. from
Selected WorkspacestoOrganisation) - Save
The change takes effect immediately. Users who previously couldn’t see the model will see it on their next page load.
Step-by-step: removing a model
- Click the delete icon on the model row
- Confirm
Removing a model breaks any flow, agent, or PebbleChat conversation that was using it. Check usage counts first; consider switching the model to
PebbleRouter onlyscope first to soft-deprecate, then remove later once usage drops to zero.
How models become available in PebbleChat
A model needs all three of these to appear in a user’s PebbleChat model selector:
- Definition enabled — available on the Enable Models tab (platform catalogue definitions are the platform admin’s job)
- Instance provisioned at a scope covering the user —
Organisation, orSelected Workspacesincluding their workspace (aUser Onlyinstance covers only the user who provisioned it) - Auth source valid — the credential or subscription account behind the instance still works (see Credentials)
If a user complains they can’t see a model they expect, walk through these three checks.
Routing models with PebbleRouter
The Models page is a flat catalogue. The next layer up is PebbleRouter, which lets you compose routing profiles from these enabled models. A routing profile defines:
- Which subset of enabled models the profile uses
- The routing strategy (load balance, failover, cost optimise)
- Per-model weights and thresholds
When a user picks Auto in their PebbleChat model selector, PebbleRouter consults the active routing profile and picks the best model for each message. So even models with PebbleRouter only scope can serve user traffic — just not directly via the model selector.
See PebbleRouter for the deep-dive.
Local and OpenAI-compatible providers (Ollama)
You can register your own OpenAI-compatible providers — including self-hosted endpoints such as Ollama that need no API key at all. This happens on the Models page’s Enable Models tab, which manages the catalogue of model definitions available for provisioning (the Provision Models tab is where you create the runnable instances from them).
Adding the provider
- Open the Enable Models tab and click Add Provider
- For Ollama, click Use Ollama preset — it pre-fills the provider key (
ollama), the display name (Ollama (Self-hosted)), the base URL (http://localhost:11434/v1), and sets Authentication to none - For any other gateway, fill in the Provider display name and Provider API base URL, and pick the Authentication mode: Requires API key or No authentication (self-hosted)
- Save
The base URL must be reachable from the PebbleAI server, not from your laptop. The Ollama preset’s
localhostdefault only works for self-hosted deployments where Ollama runs beside the Pebble server — cloud tenants need a network-reachable URL.
Adding models under it
Click Add Model on the Enable Models tab and fill in the Provider, the Model identifier (can’t be changed after creation), a Display name, the Mode (chat, completion, embedding, or image generation), token costs, Max input tokens (the context window), and capability checkboxes (Vision, Function Calling, Streaming, JSON Schema, Prompt Caching).
Provisioning without a credential
When you provision a model whose provider is configured with no authentication, the Credential picker is replaced by an info alert — “No authentication required — Ollama (Self-hosted) is a self-hosted endpoint. This model will be provisioned without a credential.” Everything else works exactly as it does for credentialled models.
Add Provider and Add Model are permission-gated (
pai:provider:createandpai:model:create). Both are included in the standard Org Admin role seeds, but a customised role may not have them.
Subscription-backed models (ChatGPT)
Organisations with a ChatGPT subscription can use it as a model auth source instead of an API key.
Connecting the account
- Go to Admin → Organisation → Settings → Subscriptions
- Under Organisation Accounts, pick the Provider — OpenAI is the only connectable provider today; Anthropic and Google appear with a coming soon suffix — plus a Connection method (ChatGPT OAuth handoff or ChatGPT device code), a name, the account email, and a reason
- Toggle Org Admin accepts provider compliance responsibility and click Connect Account
- The OpenAI authorisation page opens in a popup and a Complete Provider Authorization dialog waits in PebbleAI — approve on the OpenAI page and the connection finishes automatically. If your browser blocks the popup, use the Open OpenAI Authorization button shown in the dialog instead
If authorisation genuinely fails, you’ll see “Authorization timed out or could not be verified. Please try again.” — try the connection again.
Using the subscription
- Each connected account row has an Enable Model button that opens the Enable Subscription-Backed Model dialog — pick a provider-compatible model, name it, and choose its Availability: Organisation chat or PebbleRouter profile
- In the Provision Model dialog, the Credential dropdown lists connected subscription accounts (labelled Subscription Account) alongside API credentials — a provisioned instance always uses exactly one auth source
- Supported subscription-backed ChatGPT models are routed through PebbleRouter’s native ChatGPT support behind the scenes — there’s no extra configuration and no change to how you connect accounts or enable models
Organisation-wide use of a subscription-backed account remains the Org Admin’s compliance responsibility — the connect flow records your acknowledgement for audit.
Embedding defaults through PebbleRouter
Your organisation’s default Embedding Model — used for asset discovery and set on the Default Models tab at Admin → Organisation → Settings → Configuration — can be a provisioned instance with PebbleRouter only scope as well as an Organisation-scoped one. The picker (and the Workspace Embedding Model override) is filtered to embedding-capable models.
This lets you serve embeddings through the router without the model ever appearing in users’ chat model selectors — ideal when the embedding model exists purely as infrastructure and shouldn’t be user-pickable.
Image models for chat image generation
PebbleChat’s image generation runs on a provisioned image-capable model. To set it up:
- Enable a model whose Mode is image generation — from the platform catalogue, or via Add Model for a custom provider
- Provision it as usual on the Provision Models tab
- Go to Admin → Organisation → Settings → Configuration → Chat Settings tab → Image Creation, switch image creation on, and pick the model in the Image model dropdown — or leave it on Auto-detect (first image-capable model)
If no image-capable model is provisioned yet, the picker tells you: “No image-capable models are provisioned yet. Provision one in Models, or leave on auto-detect.” When image creation is off or unconfigured, the assistant tells users plainly that image creation isn’t available rather than erroring.
See Image Generation for the user-side experience.
Models vs Flows Models
Don’t confuse this page with Flows Models:
| Models (this page) | Flows Models | |
|---|---|---|
| Purpose | Enable models from the platform catalogue for your org | Edit the JSON definitions of models in the Flows visual builder |
| Format | Form-based table | JSON editor |
| Audience | Most admins | Power admins managing the underlying catalogue |
| Where you’d touch it | Daily / weekly | Rarely |
For most administration, this is the page you use. Flows Models is for the rare case where you need to edit raw model definitions.
Tips
- Enable a small set first. Start with a handful of models — a Fast Haiku, a Smart Opus, maybe a long-context fallback — and grow from there. Hundreds of models in the selector is a confusing UX.
- Set sharing scope deliberately. Default to
Organisationfor general-purpose models. UseSelected Workspacesfor team-specific models andPebbleRouter onlyfor fallback / cost-optimisation models you don’t want users to pick directly. - Watch usage. The Usage Count column is your guide to which models are actually pulling weight. Cull the unused ones.
- Always tie a model to a working credential. A model with a stale credential is worse than no model — users hit confusing errors. When you rotate credentials, check every model that uses them.
Related
- Credentials — must exist before you can pick a credential here
- PebbleRouter — composes routing profiles from these enabled models
- Configuration → Default Models — where the Fast / Smart / Embedding defaults point at provisioned instances
- PebbleChat → Image Generation — the user-side feature powered by your provisioned image model
- Flows Models — raw JSON model list editor
- User Settings → Models — the user side of the chain